Title: Create Menu in Android using XML
link : Create Menu in Android using XML
Create Menu in Android using XML
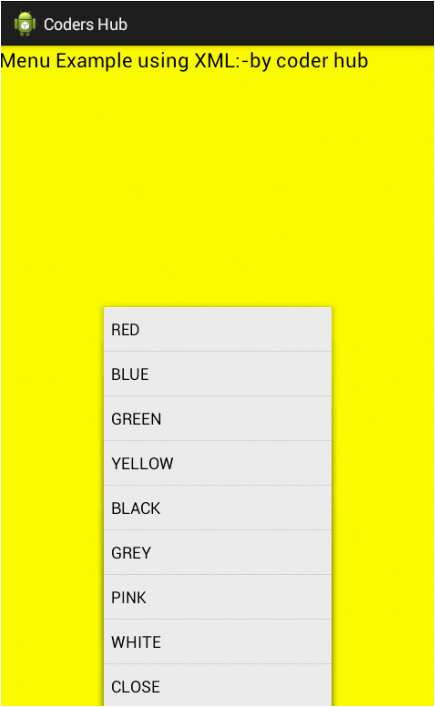
Android tutorial to learn how to create menu in Android using XML. This code will show how to create menu in android, how to perform action when we click on menu item and how to set icon in menu item but using only XML file. In next tutorial, you all can learn to do this with Java code only.
Just create a new project and give "rl" id to layout or paste below code in layout-> your main XML file
<RelativeLayout xmlns:android="http://schemas.android.com/apk/res/android"
    xmlns:tools="http://schemas.android.com/tools"
    android:layout_width="match_parent"
    android:layout_height="match_parent"
    android:id="@+id/rl"
    android:background="#143">

    <TextView
        android:id="@+id/textView1"
        android:layout_width="wrap_content"
        android:layout_height="wrap_content"
        android:layout_alignParentLeft="true"
        android:layout_alignParentTop="true"
        android:text="Menu Example using XML:-by coder hub"
        android:textAppearance="?android:attr/textAppearanceLarge" />

</RelativeLayout>
Now open menu(res->layout->menu) folder and create test_menu.xml file and create menu items or paste below code:
<menu xmlns:android="http://schemas.android.com/apk/res/android" >

    <!-- add this line in any item to
    set icon with menu android:icon="@drawable/lion -->

    <item android:id="@+id/red"
        android:title="RED">

    </item>
      <item android:id="@+id/blue"
        android:title="BLUE">

    </item>
      <item android:id="@+id/green"
        android:title="GREEN">

    </item>
      <item android:id="@+id/yellow"
        android:title="YELLOW">

    </item>
      <item android:id="@+id/black"
        android:title="BLACK">
      </item>
           <item android:id="@+id/gray"
        android:title="GREY">
        </item>

           <item android:id="@+id/pink"
        android:title="PINK">
      </item>
         <item android:id="@+id/white"
        android:title="WHITE">
      </item>
         <item android:id="@+id/close"
        android:title="CLOSE">
      </item>
</menu>
Java code with description is given below. Open Main Java file and paste below code:
package coders.hub.com; //your package name

import android.os.Bundle;
import android.app.Activity;
import android.graphics.Color;
import android.view.Menu;
import android.view.MenuItem;
import android.widget.RelativeLayout;

public class MainActivity extends Activity {

    @Override
    protected void onCreate(Bundle savedInstanceState) {
        super.onCreate(savedInstanceState);
        setContentView(R.layout.activity_main);
    }

    //This function will call when we click on menu button
    @Override
    public boolean onCreateOptionsMenu(Menu menu) {
    // Inflate the menu; this adds items to the action bar if it is present.
        getMenuInflater().inflate(R.menu.test_menu, menu);
        return super.onCreateOptionsMenu(menu);
    }

    //This function will perform action when we click on menu item
    public boolean onOptionsItemSelected(MenuItem item)
    {
      RelativeLayout rl=(RelativeLayout)findViewById(R.id.rl);
      switch(item.getItemId())
      {
      //Simply changing color of layout
      case R.id.red: rl.setBackgroundColor(Color.RED); break;
      case R.id.blue: rl.setBackgroundColor(Color.BLUE); break;
      case R.id.gray: rl.setBackgroundColor(Color.GRAY); break;
      case R.id.yellow: rl.setBackgroundColor(Color.YELLOW); break;
      case R.id.pink: rl.setBackgroundColor(Color.MAGENTA); break;
      case R.id.white: rl.setBackgroundColor(Color.WHITE); break;
      case R.id.green: rl.setBackgroundColor(Color.GREEN); break;
      case R.id.close: finish(); break;
      default: rl.setBackgroundColor(Color.BLACK);
      }
      return true;
    }
}
Not getting the above android tutorial? Comment below, i will solve your problem related to this android menu example tutorial. Share if you like above code.
That's Create Menu in Android using XML
That's an article Create Menu in Android using XML
This time, hopefully can benefit for you all. Well, see you in other article postings.
You are now reading the article Create Menu in Android using XML With link address https://u-see1.blogspot.com/2013/09/create-menu-in-android-using-xml.html

Belum ada tanggapan untuk "Create Menu in Android using XML"
Post a Comment